So....I'm hoping to get in bed a bit earlier tonight.....hmmmm.....we shall see how things go.....
But anyway....enough of that.....
So....the Hubs said I was "mean" to leave everyone hanging at the end of yesterday's post......linked HERE.....
SO....as a peace offering (ha, ha!).....I thought I would go ahead and give you all the conclusion of our little tiling project :)
SO.....let's start with the fun stuff first......here is the "After" picture with our bathtub backsplash looking so modern and fresh with its new glass tile :)
And yes.....you may also notice that you are getting a little sneak peak on our big Board and Batten project too :) Much more to come on that very soon.....I will just say that it turned out even better than I expected!! Yahoo!!
But....back to the new tile.....
I have to say that I do love it!! There were a few times during the process that I had doubts....especially when the tile was all up on the wall, but we hadn't grouted it yet....I was wavering....thinking we might have made a mistake......
BUT.....once the grout went on.....I got really excited.....it is SO cool!!
So....if you are first time tilers (like we were).....I'll say to you.....jump on in......the water's just fine....LOL.....
But seriously.....we were pretty intimidated by the idea of this whole project.....and actually laying the tile was a big part of it!!
AND.....I will say.....it does take a lot of work to get this all done.....BUT.....it is totally a doable DIY project.....seriously......trust me......you can do this if you want to!!
So....first.....pick out your tile.....we are really loving glass tile right now, so we decided to go with the glass tile that they sell by the sheet.....we bought ours at Lowe's....
Then you need to take careful measurements of the area where you will be placing tile.....and then lay out your tile somewhere (we used the floor) to make sure that you know where you need to make your "cuts" on the tile......
You will also need some of these tile spacers to make sure that you account properly for the spacing between each tile sheet......
Once you know where you need to cut the tile, then go ahead and mark it on the tile (see the red line on the tile in the picture).....this will be your guide while cutting the tile.....
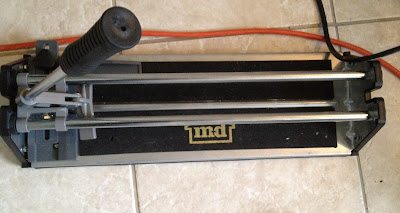
Next....."cut" the tile.....in truth you cannot actually cut the tile.....what you will do is score the tile and then break it using this handy little tool (they cost about $20 at Lowe's)......
Here's a pic of the Hubs in action.....
Once you've got your tile ready to go.....then it's time to mix the mortar.....
And you'll need a Floating Device to put the mortar up on the wall......
And now the magic begins....time to put the mortar up on the wall.....
Please note....for all you first time tile layers....you've got to drag your floating device across the mortar to created a striped sort of look....this will give the mortar somewhere to go when you press your tile onto the mortar.....I hope that makes sense....it's a little hard to explain in words....
Here's an upclose look....
And soon you'll have this....
If you use this type of tile, then you will most likely have a few places to fill in at the edge, so we just "cut" some tiles into small pieces to fill in the gaps......and then we turned some tiles sideways to give a really clean edge.....
Here's an upclose look (this pic is actually after grouting too).....
Yahoo.....we're on the home stretch now!!
The mortar will need to dry at least overnight.....and then you'll be ready to grout!!
You'll need to get some of this (grout)......
And then you literally just smear the grout onto the tile until all of the void spots are filled.....and then you use a wet sponge to wipe of the excess grout that is on top of the tile.....it will take several wipe downs to get all of the grout off of the tile.....
Not sure why, but I didn't get any pics of this step.....
AND.....then you are finished!! Yay!! And you'll have something really awesome like this.....
I was SO excited with how this turned out!! I've said it before, but I'll say it again....my Hubs did a GREAT job!! He is truly amazing!!
So....what do you guys think? Anyone inspired to start a tile project? Anyone already tackled a major tile project? Please do tell!!
I guess I better run.....so much for the early bedtime :)
Until next time....
XOXO-
Kristal
Sharing With....


2 comments:
that looks sooo good, i love the tile you chose!
Thank you SO much!! We were so excited with how it turned out :)
Post a Comment