Showing posts with label Entryway. Show all posts

Friday, January 27, 2012

Valentine's Day Mantle

Hello friends!  Here we are again....well....you guys are probably sleeping.....perhaps I should say.....here I am again.....up WAY too late!!  BUT.....I was determined today to get my little Valentine's Day "mantle" done.......so.....I am happy to say....mission accomplished!!  AND.....it is pretty darn cute if I do say so myself!

Sooooo......I won't make you wait......here it is in all it's glory ;)

Sooo....perhaps.....you need a little more information to understand what you are looking at.....

Well....let's start with the easy stuff first.....that gorgeous wreath is now doing double duty......I got it right before Christmas half off at Target.....and I loved it with my Christmas decor......

BUT....after Christmas I put it away......thinking that it was only for Christmas......and I was already making plans to make a Valentine's Day wreath.....

AND then I saw that they had this same wreath for sale again at Target........ah yeah......duh.....it is perfect for Valentines Day too!!

Here's an up close look.....it's SO pretty.....it deserves it's own picture.....


BUT.....what I am really SO excited about are those cuties that are standing on the table......so what are they???

Valentine's Day tiny mailboxes of course ;)

And they are READY for some precious Valentine LOVE notes!!

So.....I'll have to show you some up close pics, so you can see all the details.......but first.....I thought you might be interested in how they came together.....

Well...first I had a major project failure :(  Yeah.....it happens.....

First I started with one of these......


A very cute little packet to make your own mailbox......well.....as I said.....it was an epic failure.....when I put it together it was all lopsided and the door wouldn't stay shut......ugh!!  I actually bought one for one of my daughters playmates as well.....but I've warned her Mom that it may be hard to put together :)  I hope they have better luck......

Mine was so bad that I actually let my dog tear into it.....seriously.....it's just something we do around here.....you know......cheap entertainment....LOL!

ANYWAY.....I was determined to have little mailboxes!!  And I heard that you could get mini mailboxes at Target for $1.....but three Targets later......I still hadn't found any.....BOO!!  Although I heard today that at least one of the Targets in our area does have them.....

BUT....I had already come up with Plan C, which started with these guys.....which I found at Hobby Lobby....the mailboxes were $3.50 and the letters were $0.70 (both were on sale).......

And a little bit of this.....


Ahhh.....I heart you Rustoleum Spray Paint :)

And soon.....I had these.....


At this point I was just giddy....that red spray paint really brought those little mailboxes to life :)

I also picked up these guys at the Dollar Tree....I mean....a mailbox has to have a stand.....right?


And I added some embellishments.....some that came with that first mailbox kit......and some that I found in my old scrapbooking stuff.....and a couple more that I also got at Hobby Lobby....

And soon I had this cute little one made for my precious little Valentine....


Ahhhh.....I can't wait to put some Valentines in there for her!!  I LOVE my little LOVE BUG!!

And I couldn't leave out the Hubs.....so here is his special mailbox......


AND.....since I want to get some love notes too....I made one for me......


Aren't they cute?  I just feel happy every time I look at them :)

And......I can't wait to put some notes in there for my sweeties!!!

Now that you've see the up close details.....here's a few more pics of the mantle all put together.....


And a couple up close pics of the mailboxes on the "mantle".......


Ahhhh.....Love.....isn't it wonderful :)

So.....are you guys doing any decorating for Valentine's Day?  Are you making any mailboxes?  I'd love to know what awesome ideas you guys have....please....do tell!!

Gotta run.....

Until next time....

XOXO-
Kristal


Linking this Post to the Following Parties :)

Friday, December 2, 2011

DIY Christmas Wreaths

Yahoo!!  Christmas is just around the corner and we are LOVING every minute of it!!  Ok....so I guess technically it is only December 1st....BUT why not enjoy Christmas fun all month long?

So I told you last week that we did some serious crafting during Thanksgiving....and I already showed you the Santa "Hat" crafts that we made HERE......

We also got a little over zealous crazy excited about making wreaths.....so we made not 1....not 2....not 3....BUT 4 new wreaths!!  Once we got started it was just too fun to see what all we could come up with....

SO.....I can't wait any more.....I want to share.....so here's one that we made.....we called it the "traditional" wreath.....

We were SO excited with how it turned out....sooooo pretty!

AND....I've got two more to show you.....BUT first....let me tell you how to make one of these lovelies....

Stay with me....I promise they are EASY to make....seriously.....you know me.....the queen of "I love easy".....Ha!

SO......First....get your supplies.....

You'll need some of this.....


This "Deco Mesh" stuff really is like magic....it does a lot of the work for you.....I got mine at Hobby Lobby, but I know it is available at other stores too......I haven't seen it at Wal-Mart or Target, but I have seen it at Sam's and some other local stores.....believe me.....this stuff is worth a trip to the store....and one roll goes a long way.....I think one roll runs around $7.....

Also you'll need a very basic wreath....a few Christmas ornaments....and some ribbon that you like (preferably three different types)....

Now....just fluff up the wreath a little bit.....don't laugh....this is an important step.....and for some reason a lot of people forget to do this.....yeah....I know.....those people are weird....but seriously I've seen some sad looking greenery out there.....


The next step is to add the mesh to the wreath.....


You might wonder how to attach the mesh to the wreath....hold on.....this is the best part......NO HOT GLUE....no special attachments.....all you have to do is wind the mesh around the greenery and then simply wrap the green branches around the mesh.....something like this....


And soon you'll have something like this....


Don't worry if you are thinking that your wreath doesn't look too great at this point.....just keep trudging ahead....it will come together....promise :)

Next its time to add the ribbon.....here's an upclose look....


Again....all you need to do is wrap the branches of the wreath around the ribbon to keep the ribbon in place....SO EASY!!

And after adding two pieces of ribbon....you should have something like this.....


Starting to look good....but I decided that I wanted to add one more type of ribbon....to make things a little fuller looking....so I added another type of ribbon and ended up with this....


Ok....we're getting there!!  Next you'll want to add some ornaments or something similar to hide all the places that you've used the wreath branches to hold your ribbon/mesh in place....

So I decided to group three ornaments together....I just tied them together with a piece of string....and then I simply tied them around a branch on the wreath.....


And....we are almost there!!  Here's a look before putting on the finishing touches....


To add a little bling to the wreath and a little soul too.....I added the Joy sign to the middle....and ended up with this.....

The finished wreath!!


And....an upclose look.....


And here is one of it hanging up at my Mom's house....


I just LOVE how this turned out!!  I have to admit that even I was surprised at how great it looked when it was finished!! 

AND....the best part.....when my Mom walked in the room (just as I was finishing the wreath)....she said....OOOOHHHHH....that wreath is Gorgeous!!  Ummmm.....Thanks Mom!!  And right then I knew that this one would have to stay at her house :) 

SO....I've still got three more wreaths to show you!!  I can't wait....b/c they are equally as gorgeous, but yet totally different.....so stay tuned for more to come.....

Are you guys making any wreaths this year?  Something similar.....or totally different?  Anyone thinking about making one like this one?  Ahhhh....please share!!  I'd love to see :)

SO.....

Until next time.....

XOXO-
Kristal


Thursday, November 24, 2011

A Little Decor Goes a Long Way.....

Hello friends!  I hope you all are ready for an incredible Thanksgiving :)  My wish for you all is that you would have a wonderful day filled with food, fun, laughter, and time with the people that you love most.....

Doesn't that sound wonderful....I wish that everyday could be just that good.....

And for any of you that won't have that idyllic holiday tomorrow....please know that I will be thinking about and praying for you too.....

On a lighter note.....we've been in pre-holiday planning mode for a few days now....you know....a million.....trillion.....trips to crazy town Wal-Mart......and a lot of talk about who's going to be where and when.....and what we are going to eat when and where......lot's of good.....good.....stuff......

AND.....since we had some extra time on our hands.....my Mom decided to put us to work pulling together some decor for her living room, dining room, and entryway.......you may remember me telling you about the cute curtains that we put up in her living room/dining room a few weeks ago.....if not, then you can read about that here.......

So.....we thought it was time to add a few more details to that room to really bring it together.....and since the entryway is right next to it.....well.....why not work on that too.....

So.....today we'll focus on the entryway.....we started with this.....

Yeah....pretty bland.....but she did have that cute table from Ashley Furniture (find it here)....so we had something good to start with.....

SO....we didn't do too much......but you know how sometimes.....less is more......well......we ended up with this.....


Yep....love it.....the very stylish mirror/art came from Marshall's (love that place), but I've also seen it for sale at Kirkland's (another favorite)....

And the little lamp added some much needed warmth to this space and the silver tray with the wreath on top added a nice 'pop' of red color.....

Here are a couple of up close pics....

I just realized that there is duck tape sitting on the table in those last pics.....WHAT??  Why is that on there....and why didn't I realize it until now....ugh!  Oh well....hopefully you guys can overlook it.....

SO....I really like it!!  And.....the best news.....it was such an easy change!!  Yahoo!!  It is so awesome to pull a few things together and end up with a space that just makes you feel warm and happy.....too cool.....

SO.....I still need to show you the other changes we made in the Living Room and Dining Room.... hopefully I'll be able to pull together those pics in a couple of days......

So.....Until then.....HAPPY THANKSGIVING!!

XOXO-
Kristal

Monday, October 10, 2011

New Floors!! Yeah!!

Hello friends!!  How was your weekend?  I hope it was great!!  Ours was fun filled and quite busy....just the way we like it!!  :)

I really intended to post something yesterday.....but what do ya know....I couldn't find my computer power cord.....and the computer (of course) was DEAD!  Ugh!!  So.....fast forward to today.....and I still couldn't find the dumb cord!  I was seriously thinking I would have to just buy a new one, but decided to give in and admit to the hubs that I couldn't find it (double ugh!!).......AND luckily he was able to find it....BUT in my defense.....it had ended up in his "cord drawer"......which is essentially a black hole of sorts.....I NEVER go near it.....SO he had to be the one who put it in there......so Ha!  Maybe I'm not as scatterbrained as I was starting to think.....

So.....anyway......I've been meaning to post on this for a while......since you've already seen a little sneak peak it isn't really a surprise I guess....but good stuff none the less.....

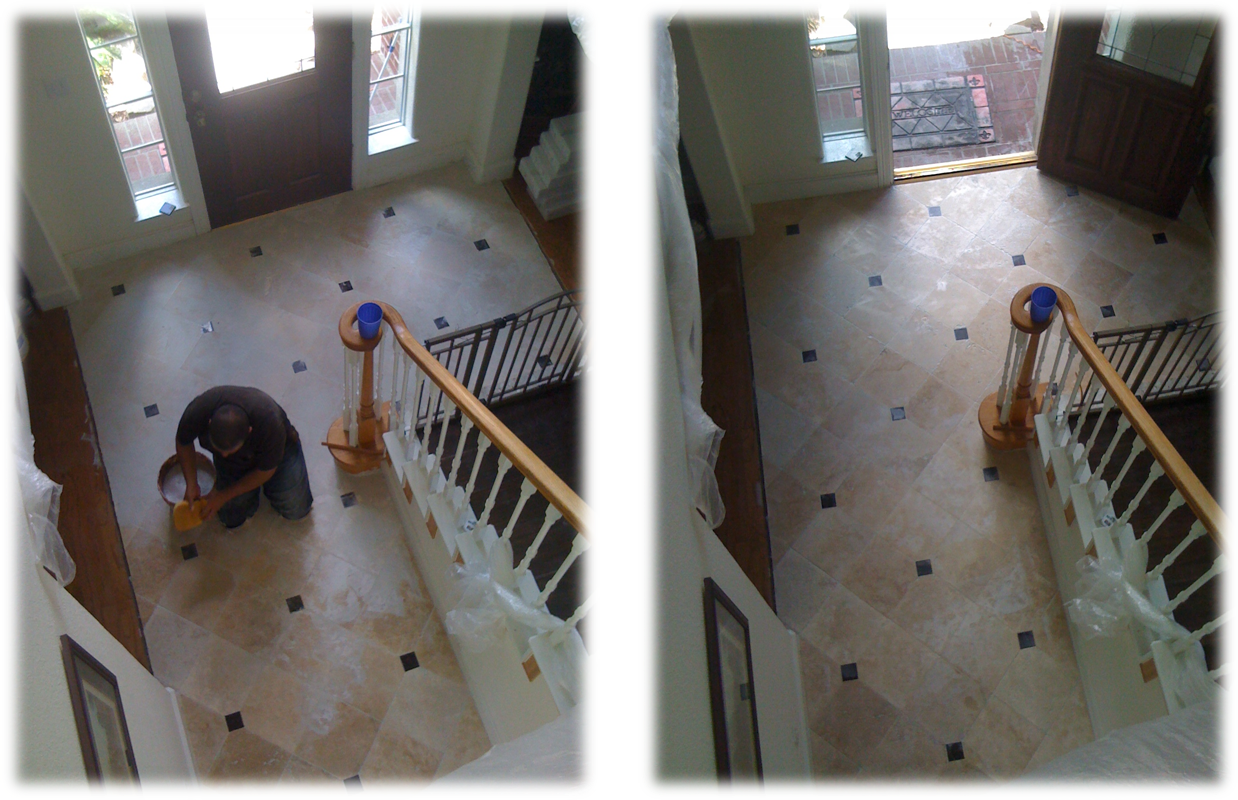
We've got new floors in the entryway!!  You might remember seeing the new floor at the bottom of our "new" stairs.....


Ohhh....it makes us feel so FANCY!!  Ha, ha!!  Seriously it does!!

As usual we agonized over what to do in this space.....previously we had wood in the entryway and all through the front of the house on the first floor......and I LOVE wood floors, so it was a hard decision to replace it!  BUT....the wood in the entryway was in pretty bad shape.....it was really faded from all the light that comes through that big window over the door......and there was some water damage from all of us tracking in our wet feet......and my "little" bulldog had really done a number on it with his toenails (he loves to stand at those windows next to the door and bark at all the neighbors).....

BUT....come on....who couldn't forgive this precious little face.....


BUT.....the biggest reason for change.....we wanted to put a dark wood floor in the back of our house in the den.......so I don't know if this is a rule or not (and we don't necessarily follow decorating rules at our house anyway), but I have always heard that you shouldn't have different woods touch each other.......SO in order to break up the lighter wood in the front of the house from the (soon to be) dark wood in our den.....we needed something different in the entryway.....

So......what to get.....what to get......

We ultimately decided to go with a stone entryway with granite accents......so this would sort of mirror what we have in our backsplash in the kitchen....using a similar type of stone and the same granite.....

So.....here.....we.....go.......we decided that this was not a project we could do ourselves.....and oh my goodness....in hindsight what a good decision that was.....

That wood floor was SERIOUSLY stuck.....


At first the guy worked with a hammer and a chisel....YEAH.....that wasn't working!!  So next.....I kid you not.....they brought in a jackhammer type thing.....


And....finally.....after a LOT of work....those wood floors were gone! 

Next.....the guy got busy installing the stone & granite....


Wow!!  The guy did an AWESOME job!!  He is the same guy who installed our kitchen backsplash....so we knew that it was going to be GORGEOUS!!

Again....we used "our guy" from Reema Flooring in Pearland, TX who does all types of countertops and flooring....He is great to work with and we were really happy with everything! He does jobs all over Houston and the Houston suburbs....If you want to see the work they did in our kitchen, then check it out here.....

If any of you decide to use him.....just be sure to tell him that you heard about him from me :)  And.....no.....I'm not getting anything for this little endorsement!!

So....finally.....the floors were finished.....

Here you can see the lighter wood still in the front two rooms....the new entryway floor.....and the refinished staircase.....


And....how about just one more.....with the refinished stairs in the foreground....


Ahhh....LOVE.....IT!!  After all the agony over what to do in this space.....we were SO HAPPY with how it all turned out!!  You just never know....ya know......until you see it....in your house......

Anyone else put down stone in their house or made over an entryway?  Did you do the work yourself or hire it out?  I would love to hear about it!!

Until next time.....

XOXO,
Kristal

Related Posts Plugin for WordPress, Blogger...