Sunday, February 26, 2012

Happy Birthday Kali Part I - Making Miniature Chalkboard Signs

Well.....it's been two weeks now....and I still haven't posted about my little girls birthday party.....it was SO fun.....so I'm really excited to share the details :)

But the truth is that I am waiting to get pictures from my brother and sister-in-law's camera....they always take most of the pictures (and I am SO thankful) b/c I never have time to take any.....I'm always running around like a crazy person trying to make sure everything is going ok and everyone is having fun!! 

BUT....I do have a few pictures that I took before the party.....so I thought I would share one of the fun little things that I put together to decorate the birthday girls table of goodies :)

SO......what am I talking about.....well....here's a hint.....


Yep.....that's right....I made some cute little chalkboard signs to decorate our party table :)

I was so happy with how they turned out.....and they were SUPER easy to make!!

I started out with some very cheap picture frames from Wal-Mart.....I think the bigger one (black frame) was $2 and the little plastic one was less than $1....


And then I got some Krylon Chalkboard Spray Paint......Ohhhh....yeah.....ya'll know about my love for spray paint :)


This was my first time to use chalkboard paint.....and I've wanted to try it for a while.....so I was pretty excited to finally have a reason to try it out!!

SO.....I just took the glass out of the frame and gave it a good spray paint job.....if you've forgotten my tips for a good spray paint job.....then go HERE to get a refresher......but of course....no need to sand the glass :)

And soon.....I had these.....


TOO CUTE!!  BUT I can't take any credit for the cute chalk work.....my sister did all of the "writing" on the chalkboards.....and I thought she did a great job.....chalk can be a little difficult to work with.......

And....then I decided to add a little ribbon with some double sided tape, so that the chalkboards would have some coordinating color......

Here is one after the ribbon was put on......


AND....just for fun.....here's a little sneak peak at our birthday table with our chalkboards in place.....

The Candy Bar......those little SweetTart Gummies were delicious.....people just kept talking about those.....I think they might be addictive....LOL......


And my favorite.....The Chocolate Bar......

YUMMMM.....Lot's of Hershey's Kisses :)


And the really cool thing....since they are chalkboards.....you can just erase them and use them again....so I used them for the Hubs birthday too......after I removed the ribbon of course :)


Super cool....I'm thinking you'll see them show up again in the future....perhaps in my holiday mantle decor....or something.....

SO.....I can't wait to show you the rest of the party details!!  As soon as I get the pics....I promise I'll share :)

SO.....anyone else out there experimented with chalkboard paint?  PLEASE DO TELL!!  I have to say....I'm diggin it!! 

Well....it's getting late.....so I guess I better run....

Until next time.....

XOXO-
Kristal

Sharing With....

Wednesday, February 22, 2012

Master Bathroom Update & How to Tile a Bathtub Backsplash Part II

Hey guys!  I hope your week is off to a great start!!  I'm tired, but it's because I only slept a few hours last night....totally my own fault....but still.....ugh....it made for a hard day today!!

So....I'm hoping to get in bed a bit earlier tonight.....hmmmm.....we shall see how things go.....

But anyway....enough of that.....

So....the Hubs said I was "mean" to leave everyone hanging at the end of yesterday's post......linked HERE.....

SO....as a peace offering (ha, ha!).....I thought I would go ahead and give you all the conclusion of our little tiling project :)

SO.....let's start with the fun stuff first......here is the "After" picture with our bathtub backsplash looking so modern and fresh with its new glass tile :)

And yes.....you may also notice that you are getting a little sneak peak on our big Board and Batten project too :)  Much more to come on that very soon.....I will just say that it turned out even better than I expected!!  Yahoo!!

But....back to the new tile.....

I have to say that I do love it!!  There were a few times during the process that I had doubts....especially when the tile was all up on the wall, but we hadn't grouted it yet....I was wavering....thinking we might have made a mistake......

BUT.....once the grout went on.....I got really excited.....it is SO cool!!

So....if you are first time tilers (like we were).....I'll say to you.....jump on in......the water's just fine....LOL.....

But seriously.....we were pretty intimidated by the idea of this whole project.....and actually laying the tile was a big part of it!!

AND.....I will say.....it does take a lot of work to get this all done.....BUT.....it is totally a doable DIY project.....seriously......trust me......you can do this if you want to!!

So....first.....pick out your tile.....we are really loving glass tile right now, so we decided to go with the glass tile that they sell by the sheet.....we bought ours at Lowe's....


Then you need to take careful measurements of the area where you will be placing tile.....and then lay out your tile somewhere (we used the floor) to make sure that you know where you need to make your "cuts" on the tile......


You will also need some of these tile spacers to make sure that you account properly for the spacing between each tile sheet......


Once you know where you need to cut the tile, then go ahead and mark it on the tile (see the red line on the tile in the picture).....this will be your guide while cutting the tile.....


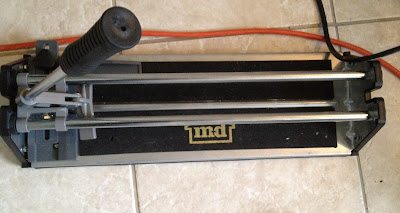
Next....."cut" the tile.....in truth you cannot actually cut the tile.....what you will do is score the tile and then break it using this handy little tool (they cost about $20 at Lowe's)......


Here's a pic of the Hubs in action.....


Once you've got your tile ready to go.....then it's time to mix the mortar.....


And you'll need a Floating Device to put the mortar up on the wall......


And now the magic begins....time to put the mortar up on the wall.....


Please note....for all you first time tile layers....you've got to drag your floating device across the mortar to created a striped sort of look....this will give the mortar somewhere to go when you press your tile onto the mortar.....I hope that makes sense....it's a little hard to explain in words....

Here's an upclose look....


And soon you'll have this....

If you use this type of tile, then you will most likely have a few places to fill in at the edge, so we just "cut" some tiles into small pieces to fill in the gaps......and then we turned some tiles sideways to give a really clean edge.....

Here's an upclose look (this pic is actually after grouting too).....


Yahoo.....we're on the home stretch now!!

The mortar will need to dry at least overnight.....and then you'll be ready to grout!!

You'll need to get some of this (grout)......


And then you literally just smear the grout onto the tile until all of the void spots are filled.....and then you use a wet sponge to wipe of the excess grout that is on top of the tile.....it will take several wipe downs to get all of the grout off of the tile.....

Not sure why, but I didn't get any pics of this step.....

AND.....then you are finished!!  Yay!!  And you'll have something really awesome like this.....


I was SO excited with how this turned out!!  I've said it before, but I'll say it again....my Hubs did a GREAT job!!  He is truly amazing!!

So....what do you guys think?  Anyone inspired to start a tile project?  Anyone already tackled a major tile project?  Please do tell!!

I guess I better run.....so much for the early bedtime :)

Until next time....

XOXO-
Kristal

Sharing With....

Tuesday, February 21, 2012

Master Bathroom Update & How to Tile a Bathtub Backsplash Part I

Hello friends!!  Let me just address the obvious first.....yep....that's right....I'm still alive....LOL!!  Ok....so I've only been off the grid for a couple of days.....but....seriously.....it seems like a lot longer!! 

I SO miss chatting with you guys when life get's crazy and I can't post for a couple of days.....

I think I mentioned last week that my baby girl was sick....and boy was she ever....she ran 102+ fever for 5 days....it was awful!!  SO.....I basically didn't do anything for those 5 days but take care of her.....and although I hated that she was sick....I LOVED the snuggle time! 

Then this past weekend....my folks were in town....and they agreed to watch Kali, so that we could make some progress on our Master Bathroom makeover.....and we made some major progress!!  Yahoo!!

SO.....speaking of the Master Bath.....it is really coming along......one of the things that is now complete is the makeover of the bathtub backsplash.....and it looks awesome!!

I have to give the Hubs all the credit!!  Neither of us had ever tackled a tiling project before.....but he figured it all out and did an amazing job!!

SO....here is what the bathtub and backsplash looked like before we started.....

And here's a couple up close pics....

It was OK....but not great....and I'm not sure if you can tell in the picture, but the backsplash is a creme color and the bathtub is white....it just looked weird.....and sort of boring....

SO.....we decided to jump off into the deep end and do a little demo and then some tile....oh boy.....here we go.....

So first the demo....


Yep....no turning back now :)  Even our bulldog, Drako, had to come and take a look.....


And soon we had this.....


As you can see....the wall was pretty torn up after we removed the panels.....but we expected that....and it didn't matter anyway, because the drywall needed to be replaced with a concrete (water resistant) board before the tiling could start.....

SO.....next we had to cut out the bad drywall....


And soon we had this.....


Pretty ugly....huh.....no worries....I promise.....this turns out well in the end.....  :)

Next we had to install the concrete (water resistant) board.....but first the Hubs decided to buiild in a little extra protection, so he stapled up some plastic sheets.....we weren't sure if this was necessary, but it couldn't hurt.....right?


And then the concrete board.....


So.....a couple notes on the concrete board.....

It is a bit difficult to work with....you can't really cut it like you do drywall....you actually have to score it and then break it....so it can be a bit difficult to get exactly the size that you need....

And you need to leave a small gap at the bottom....between the board and the bathtub.....which will later be filled in with caulk.....

The gap looked like this.....


And then you've got to apply a patch to cover the seam between the new concrete board and the existing drywall above.....and it looked like this.....


And here's another up close look......

And here's a big picture look......

Whew......ok....now to move on the the pretty stuff!!  YAY!!

BUT.....to keep this post from becoming like War and Peace.....I think I'll stop here for now.....but I promise.....a post with the pretty stuff is coming......probably tomorrow :)

Until next time.....

XOXO-
Kristal

Tuesday, February 14, 2012

Cute, Easy, and Inexpensive Valentines Day Treats for Classmates

Happy Valentines Day friends!!  Are you all feeling the LOVE today?  I certainly hope so :)

We don't actually celebrate Valentines Day like most folks.....it's been a long standing "soap box" of the Hubs that this is a commercial holiday.....and therefore not to be celebrated.......

And to that I say BOOOOO!!  But just because he doesn't want to celebrate.....doesn't mean that he can stop the rest of us!!  Ha!!  I already told you guys about our Valentines Day Mailboxes HERE......and even the Hubs cracked a smile when he found out that he had Valentines in his box :)

Of course, we do always do something for our little girl on Valentines Day.....there is just no way to resist celebrating our love for that little cutie pie!!

And then there is the Valentines party at our daughters "school" (Mother's Day Out).....Oh Man.....I have always loved a school holiday party.....this goes WAY back to elementary school for me.....I looked forward to those little school parties SO much....

SO.....I can't help but still feel like a kid whenever I hear they are having a school party.....

SO.....I had to come up with something sweet for Kali to give to the little Valentines in her class.....

AND.....I decided to keep it simple.....so I went with two things that Kali loves.....Bubbles and Balloons!!  And then added a precious little card and "boom" we had our sweet little Valentine treat......

So....here is what we ended up with.....


And here are the details.....

It all started with a precious little Shutterfly card featuring my little Valentine....


I LOVE shutterfly!!  They have the most awesome products and once you start using them, they send you great coupons and offer codes!! 

And then we added some red heart balloons.....and some bubbles......


The super cool thing....you can get those red heart balloons for $0.69 per balloon if you buy a dozen at Party City!!  $0.69......and you kidding me.....what a great price!!  And the bubbles were actually left over from her birthday party.....so those were "free"......oh yeah.....Momma likes free!!

And....seeing all those little balloons, bubbles, and cards lined up in the hallway waiting for the kids to discover them.....I just felt giddy :)

Unfortunately, I didn't get to stay to see the kids faces....my little Valentine was sick today.....so I had to hurry home after I dropped them off......

I hope they loved them as much as we did :)

SO.....what are you guys doing for Valentines Day?  Any big plans?  Are there any other "non-celebrators" out there?  Are any of you making special treats for your kids classes or are you sticking to the traditional Valentine cards?

I hope you all have an AWESOME Valentines Day.....filled with LOTS of love!

Until next time.....

XOXO-
Kristal

Thursday, February 9, 2012

Kali's Turning Two!! A Sneak Peak at Our Birthday Party Prep....

Hello friends!  I hope you've had a good week and are coasting into the weekend....yahoo....tomorrow is Friday!! :)

Have you ever had one of those days where you had a million things on your "to do" list and yet somehow you find yourself doing EVERYTHING BUT what's on your list?  Yep....that's me today.....Ugh.....why do I do this to myself? 

Oh well....everything will get done.....or it won't.....either way it will be ok.

I am getting pretty excited though....our house has turned into Party Planning Central!!  We are now at T-50 hours to go until the BIG birthday blow out at our house....LOL!!  My baby girl is turning TWO YEARS OLD!!  I seriously cannot believe it!!

Today they celebrated her birthday at her "school"....her teachers made her a little cake with candles and everything....it was truly precious.....and her teachers are an absolute God send!!  We LOVE them :)

SO....now we've just got to get everything together for the party at our house.....

SO....we are definitely not ready yet, but I thought I might share a sneak peak of a few of the details coming together......

First....here is the adorable invitation for the party....this was designed and ordered through Shutterfly.com.  They have SUCH awesome stuff!!


I thought they turned out SO cute :)

And last night I pulled together this....


Ahhh.....super cute!  And super cheap and easy to make.....I promise to give the details of how this was put together in a future post :)

Here's a couple more pics just for fun....


And around midnight last night I finished up these guys....


A little "bling" for the millions of juice boxes that will inevitably be consumed during the party :)  Again....I promise to give the skinny on how to make these juice box personalized labels in a future post....they were also very easy to make....but I did cheat a little and started with a kit.....

Here's another look.....


I sent one of those in baby girl's lunch today, so she would have a special juice for her lunch.....

And one other little project that I finished up yesterday was these tiny chalkboards that we'll use to label all the goodies on our party table....


They aren't perfect, but I was happy with how they turned out....more to come on how to make these little guys too....

SO....we are getting there....so much more to do.....but it is coming together!!  I probably won't get a chance to show anything else until after the party, but I'm looking forward to showing you guys all the finished details :)  I think this party is going to be FUN!!

Better run....I need to get on that "to do" list.....

Until next time....

XOXO-
Kristal

Sharing With....
Related Posts Plugin for WordPress, Blogger...