Showing posts with label Christmas. Show all posts

Sunday, December 25, 2011

Merry Christmas

Merry Christmas Friends!! 

I hope that your day was wonderful....filled with friends and family.....fun times and LOTS of Love!!

And I pray that each of us will remember the real reason for Christmas.....which is Jesus Christ.....our Lord!! 

Merry Christmas.....From Our Family to Yours.....

Card Designed on www.shutterfly.com

Thanks for reading, listening, encouraging and supporting me this past year.....I'm looking forward to so much more in 2012....
 
With Love-
Kristal

Wednesday, December 21, 2011

The Fourth.....And Final Wreath.....Revealed.....

Merry Christmas Week friends!  We are now T-5 and counting.....whew......the big day is almost here!!  I made a serious dent in my Christmas shopping today......thank goodness!!  I was seriously starting to get worried that I wasn't going to be able to pull it all together this year.....but......I'm feeling MUCH better now :)

SO.....since I'm feeling all good right now....I thought it would be a good time to reveal the fourth and final wreath that resulted from our Thanksgiving Craftfest that I told you guys about HERE......HERE.....and HERE.......

The fourth wreath is a bit similar to something that I've already shown you....remember when I showed you the centerpiece that I made for my dining table HERE......well....if you remember.....that centerpiece was actually supposed to be a wreath......but my wire was not cooperating......

SO.....I decided to give the ornament wreath another try.....and this time I used a better wire.....and......yes......success!!

So......here it is......hanging on my Mom's front door......


I think it turned out really cute!!  I especially like the silver ornaments mixed in that have a little detailing on them....they just give the wreath a little extra dimension.....too cool!!

So.....in my post on the centerpiece......I sorta gave directions for making one of these......but I didn't include any pics....and since I've gotten some questions on the "how to".....I thought maybe I should give a few more details......

So.....here's the step by step directions.....with pics!!

First.....get the ornaments......I like to use plastic for safety reasons (these came from Wal-Mart).....


And then some wire.......just make sure you use some sturdy wire, so the wreath will be able to hold it's shape.....I used some old wire my Dad had around the house......


Next....start putting the ornaments onto the wire.....


And here is how it will look after you get a few ornaments threaded on the wire.....


And after a few more.....you can see how it's starting to come together.......


And after a few more.....it's almost done......


Now.....all that's left is to bring the ends together and tie the wire.......make sure you pull the wire tight.....


And then.....just like magic.....it's finished!!


I just love this project!!  It's SO easy!!  And the result is awesome!!  Too fun!!

And here's one more look at this beauty hanging on the door.....


Are any of you making ornament wreaths or centerpieces this year?  There's still time....this is literally a 30 minute or less project from start to finish!! 

Or......if you don't have time to make one before Christmas, then you might considering getting yourself some ornaments on sale after Christmas to make one of these beauties for next year.....

We are already planning for some after Christmas craftiness at my house.......  :)

I hope y'all are having an amazing week!!

Until next time......

XOXO-
Kristal

Sunday, December 18, 2011

Cute & Inexpensive Christmas Gifts for Teachers and Friends

Hello friends!  Can you believe that Christmas is just 8 days away now.....crazy.....the month of December goes by SO fast!! 

Well....if your house is anything like mine.....then your life is BUSY right now!!  Of course I've waited until the last minute to do a lot of my shopping....which is totally my fault.....but that 's how I roll......and I guess it will never change.....sometimes I think I'll do better.....and shop early......but I know that I really won't......I think I like the thrill of the last minute shopping.....or I'm just a little sadistic......who knows.....but either way......I'll be shopping up until Christmas Eve......just like every year for as long as I can remember.......

BUT....one thing that I have already taken care of this year is gifts for my daughters preschool teachers.....

SO.....since they turned out so well.....I thought I would share with you guys in case you need some last minute cute and inexpensive teacher/friend/co-worker/neighbor gift ideas.....

SO.....here's a glimpse at what I came up with.....


AND....you might be wondering.....what is it?

Well......it started out as this.....


It's a candle from Bath & Body Works.....I LOVE THESE CANDLES!!  They have so many different scents to choose from.....and they are so fragrant.....and fabulous.....and awesome!!  I am burning the Twisted Peppermint as I type this.....yuuuuummmmmm....it smells SO GOOD!!

AND the best news.....they have them on sale right now!!  I got them this last week at 2 for $20!!  So....just $10 each.....and these candles last FOREVER!!  Seriously.....like months worth of burning.....so......in my book.......definitely worth the 10 bucks!

AND......once I had the candles, then all I needed to do was Christmas-fy them a little.....which was SO easy to do......

I used that awesome Deco Mesh stuff.....remember.....the magic stuff that I told you about HERE......

And to get started I just put the candle in the middle of a big piece.....like so.....


And then.....I folded one side over the candle......and I used a piece of tape to hold it in place while I pulled everything else together.....it should look something like this.....


And then I folded the other side over the candle.....and used a little more tape to help keep it in place while I finished pulling together the mesh......it looked like this......


And then I just pulled up the other two sides over the candle.....


And tied it with a cute ribbon......

And....if you use a wired ribbon.....then you can curl it just by wrapping it around your finger a couple of times.....Something like this....


And.....lastly.....I added a couple of ornaments to the front for a little flair.....I just tied them together with a piece of string and then tied them around the mesh....


Ummmm......yeah......doesn't get much easier than that!!  And.....I think they turned our so darn cute!!  And the best part.....they didn't cost a fortune!!  Yahoo!

I think these are great for teacher gifts or for friends or neighbors.....at just $10 each.....you really can't beat it!!

Here's one more little peak at these cuties....they are sitting on my car.....waiting to go inside to my daughters teachers......


The coolest thing....when I handed them to her teachers....the first thing they said was "Ohhhh....they are so pretty!!".......

Rock On!!  What a great feeling!!

AND.....if you need even more ideas.....then check out the Creativity Exchange by clicking HERE.....she has some great teacher gift ideas too!

SO.....how are you guys doing on your Christmas preparation.....have you bought all of your gifts?  Do you guys have any great teacher/friend inexpensive gift ideas.....oh....please do share!!

Until next time.....

XOXO-
Kristal

Thursday, December 8, 2011

Wreaths, Wreaths.....And More Wreaths

Don't you just love a gorgeous wreath?  I have to say I do!!  And I've already shown you what we called the "traditional" wreath that we made during our Thanksgiving Craft Fest HERE....

And I also told you that we made three more and I promised to share.....so.....today I want to share two more.....

Christmas is just around the corner, so if you guys want to make one of these.....now is the time.....and you can find the step by step how to directions HERE.....they really are easy!!

So without further adieu.....I present to you....what we call....the Candy Can Wreath......


Pretty cute....huh?  Here are a few up close pics so you can see the details....


And just for fun....a peak at it hanging on my front door.....


I like how it makes a BIG statement on the front door!!  You definitely won't miss this baby!!  It's a little over the top, but I like it....it screams..... MERRY CHRISTMAS Y'ALL!!!  I mean we do live in Texas....so everythings gotta be bigger here....right....ha, ha!!

SO....now you've seen two of the four wreaths....and I promised that I would show you two today....

SO....here is wreath number three....which we labeled the "Modern Christmas" wreath.....

It was made by my sister....which is funny b/c I had to sort of beg to get her to craft with me....but then once she saw the first two wreaths....she got pretty excited about it all.....and with my "coaching" as she says.....she made this cutie.....


And here's an upclose look....


Super cute!!  And I was SO excited that she was able to make it all by herself!!  I love showing someone how to do something and then seeing them do it for themselves....too cool!!

Unfortunately, the sister refused to pose for a picture.....as she was mobbed by the paparazzi (me).....ha, ha!!  Here she is dodging her public.....


Love you sis!!  Don't kill me for this....k......

We were exhausted after all of our crafting.....so I took a pic of the clock just to show you how late it was....


Yep....that's right....2:15 AM!!!  Yes....we are totally nuts committed!!  Seriously....we were having fun....so the time just slipped away.....I tend to be a night owl anyway....so it was all good.....

Whew....ok....so that's a lot of wreaths.....and.....if you can believe it.....I still have one more to show you.....but it's totally different......

Are you guys making any wreaths this year?  I'd love to hear what you're up to and see pics if you have them.....

I guess I better run....just heard the timer on the stove go off......

Until next time....

XOXO-
Kristal

Monday, December 5, 2011

Christmas Tablescape Trial Run

Hello sweet friends!!  I hope your week is off to a great start!!  If you're like us, then your December is just getting busier and busier....but in a wonderful way!!  And as a double bonus we've gotten a slug of cold air come through...so at least for a couple of days....it actually feels like Christmas!!  It's awesome!!

I've got most of my Christmas decorations up now....but just can't seem to leave it alone....and find myself adding a little something here or there almost everyday.....I guess that's not a bad thing, but I know I'll be kicking myself when it comes time to take it all down......BUT.....I am LOVING it while it's up!!!  I'll have to give you guys the grand tour sometime soon.....

BUT.....today we are focusing on the tablescape......they are doing a link up party over at The Lettered Cottage.....so you can go there to check out everyone else's gorgeous tables......by clicking HERE......

AND I didn't want to miss out on the fun.....so I decided to go ahead and make a trial run with my Christmas table decorations.....

AND....what fun would it be if I didn't share it with you guys too?  SO....here you go.....


Of course you guys have already seen my centerpiece and how I made it.....but if you want to look again....then you can find it HERE......

SO.....with the centerpiece already done.....it wasn't too hard to add the rest.....

SO.....I'll share a few more pics and then an couple cheats secrets tips ....

Here's a look at the whole table.....


And one more of the whole table.....


And a few up close looks.....


Ok.....so I promised a couple of tricks.....well....when I started putting this together I already had the centerpiece that I made.....and I used my China and crystal (that we got for our wedding)....and I used the silver charger plates that I've had for years....AND.....I was determined not to buy anything to finish out the table.....SO.....I had to improvise.....

Hmmmmm....what to do.....and then the ideas started flowing.....and I ended up using scrap book paper for the placemats....and I actually really like it......the paper is the perfect color and so blingy with all it's glittery goodness :)  And....seriously....with the charger plate, the real plates, the glasses, etc, etc....do you really need much more?? 

Oh yeah....then I hit another problem....no napkins.....ugh!  Well....that one was a bit harder....and I thought about going to buy some.....but I'm proud to say that I didn't.....I ended up using some more of that Deco Mesh stuff that I talked about HERE to stand in for napkins and also look pretty.....and then I topped the mesh with some cheapo Wal-Mart ornaments....and I think those little Reindeer are so pretty :)

And the last thing that I did was to put a large ornament in each glass.....and that was it.....

As usual....we've got to keep things easy around here.....it took me about an hour to dream it up and put it all together.....seriously.....

AND....just to keep it real.....I took a pic of this room before I started my little transformation.....I can't believe I'm showing you this.....but here it is......


You know.....ya gotta live.....so things get messy sometimes.... ;)

Ok....so now forget all about that awful picture....and focus instead on some more table beautifulness (yeah....I know it's not a real word)......


So....what do you guys think?  I think it turned out really nice.....

Are any of you working on some new decor for your table this year?  Do you have any unique tricks or tips that you use?  As usual....I'd love to hear.....I'm all about copying sharing ideas :)

I need to show you how the rest of this room turned out, but we'll save that for another day.....

Until next time.....

XOXO-
Kristal

Friday, December 2, 2011

DIY Christmas Wreaths

Yahoo!!  Christmas is just around the corner and we are LOVING every minute of it!!  Ok....so I guess technically it is only December 1st....BUT why not enjoy Christmas fun all month long?

So I told you last week that we did some serious crafting during Thanksgiving....and I already showed you the Santa "Hat" crafts that we made HERE......

We also got a little over zealous crazy excited about making wreaths.....so we made not 1....not 2....not 3....BUT 4 new wreaths!!  Once we got started it was just too fun to see what all we could come up with....

SO.....I can't wait any more.....I want to share.....so here's one that we made.....we called it the "traditional" wreath.....

We were SO excited with how it turned out....sooooo pretty!

AND....I've got two more to show you.....BUT first....let me tell you how to make one of these lovelies....

Stay with me....I promise they are EASY to make....seriously.....you know me.....the queen of "I love easy".....Ha!

SO......First....get your supplies.....

You'll need some of this.....


This "Deco Mesh" stuff really is like magic....it does a lot of the work for you.....I got mine at Hobby Lobby, but I know it is available at other stores too......I haven't seen it at Wal-Mart or Target, but I have seen it at Sam's and some other local stores.....believe me.....this stuff is worth a trip to the store....and one roll goes a long way.....I think one roll runs around $7.....

Also you'll need a very basic wreath....a few Christmas ornaments....and some ribbon that you like (preferably three different types)....

Now....just fluff up the wreath a little bit.....don't laugh....this is an important step.....and for some reason a lot of people forget to do this.....yeah....I know.....those people are weird....but seriously I've seen some sad looking greenery out there.....


The next step is to add the mesh to the wreath.....


You might wonder how to attach the mesh to the wreath....hold on.....this is the best part......NO HOT GLUE....no special attachments.....all you have to do is wind the mesh around the greenery and then simply wrap the green branches around the mesh.....something like this....


And soon you'll have something like this....


Don't worry if you are thinking that your wreath doesn't look too great at this point.....just keep trudging ahead....it will come together....promise :)

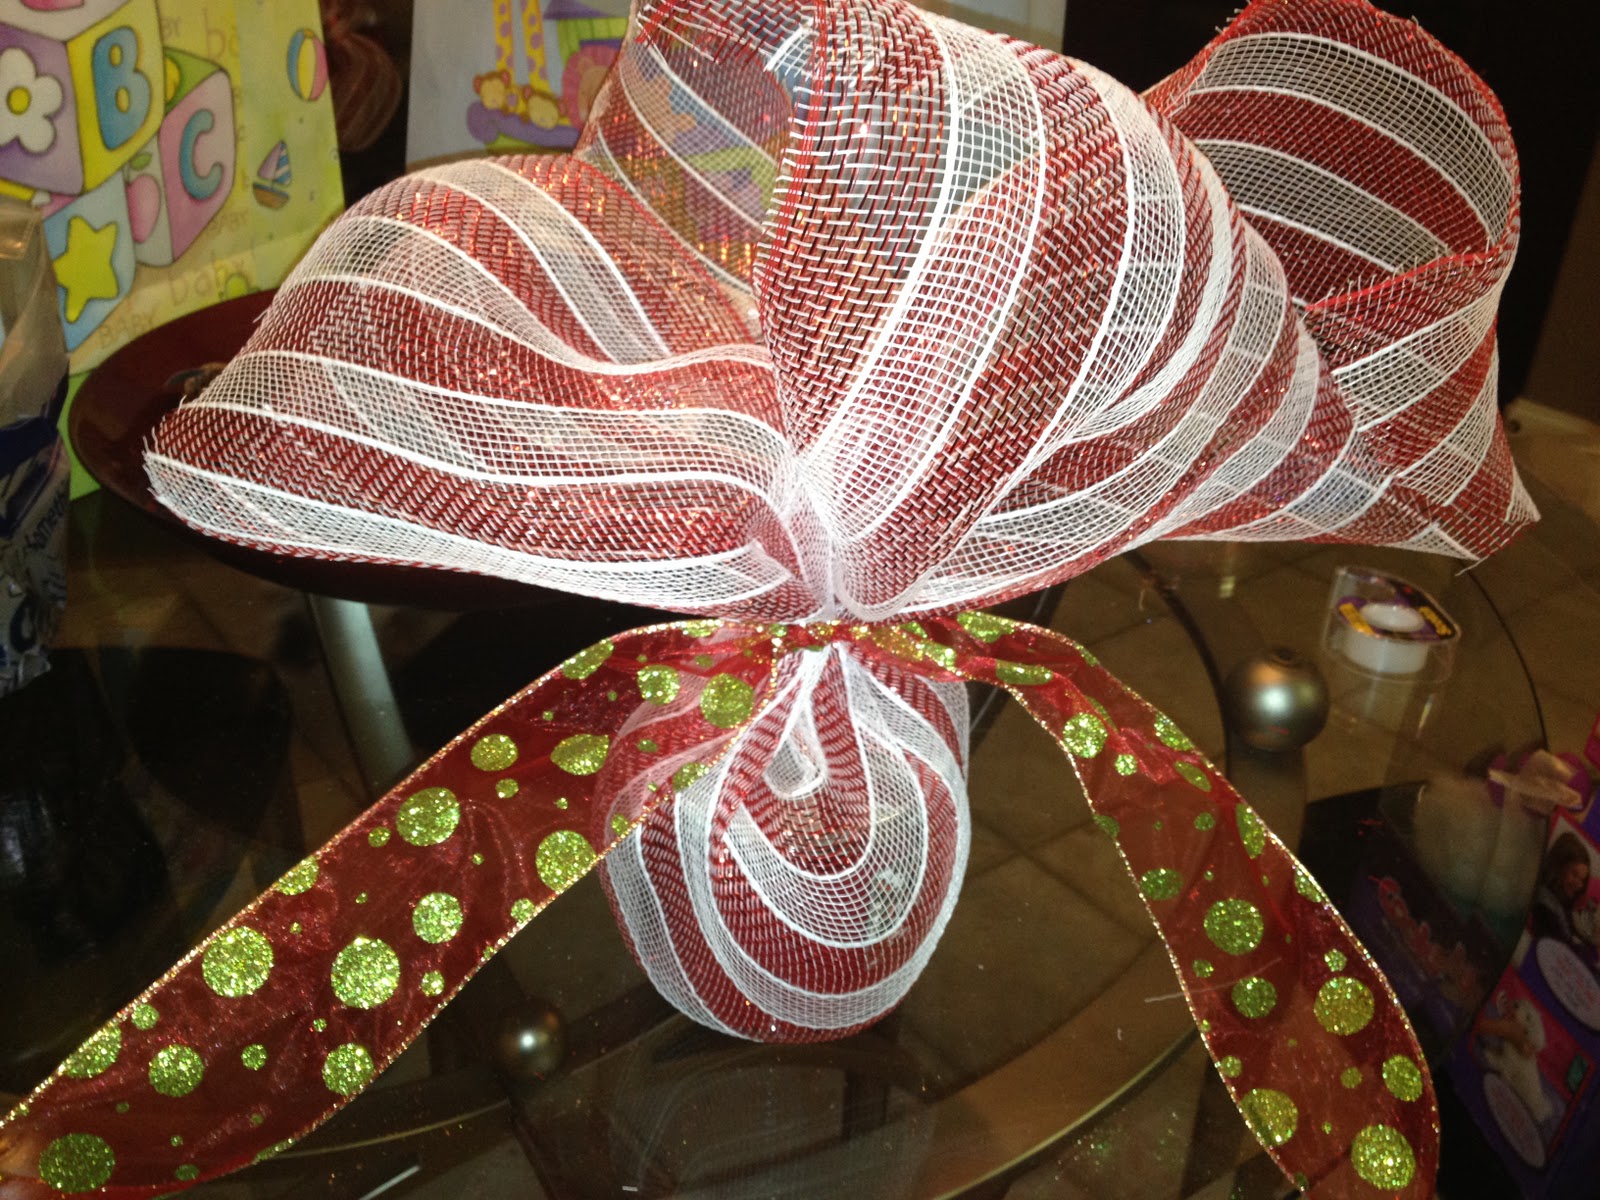
Next its time to add the ribbon.....here's an upclose look....


Again....all you need to do is wrap the branches of the wreath around the ribbon to keep the ribbon in place....SO EASY!!

And after adding two pieces of ribbon....you should have something like this.....


Starting to look good....but I decided that I wanted to add one more type of ribbon....to make things a little fuller looking....so I added another type of ribbon and ended up with this....


Ok....we're getting there!!  Next you'll want to add some ornaments or something similar to hide all the places that you've used the wreath branches to hold your ribbon/mesh in place....

So I decided to group three ornaments together....I just tied them together with a piece of string....and then I simply tied them around a branch on the wreath.....


And....we are almost there!!  Here's a look before putting on the finishing touches....


To add a little bling to the wreath and a little soul too.....I added the Joy sign to the middle....and ended up with this.....

The finished wreath!!


And....an upclose look.....


And here is one of it hanging up at my Mom's house....


I just LOVE how this turned out!!  I have to admit that even I was surprised at how great it looked when it was finished!! 

AND....the best part.....when my Mom walked in the room (just as I was finishing the wreath)....she said....OOOOHHHHH....that wreath is Gorgeous!!  Ummmm.....Thanks Mom!!  And right then I knew that this one would have to stay at her house :) 

SO....I've still got three more wreaths to show you!!  I can't wait....b/c they are equally as gorgeous, but yet totally different.....so stay tuned for more to come.....

Are you guys making any wreaths this year?  Something similar.....or totally different?  Anyone thinking about making one like this one?  Ahhhh....please share!!  I'd love to see :)

SO.....

Until next time.....

XOXO-
Kristal


Related Posts Plugin for WordPress, Blogger...