Monday, October 24, 2011

A Broken Leg.....and Some New Wood Floors

Hello friends!!  Whew.....what a LONG week it's been......you know how you've always got plans.....and then something happens......and suddenly all your plans are thrown out the window......well......that is definitely my story for this last week.......

My Mom called me late last Monday night to tell me that my Dad had been thrown off of a horse and was being taken by ambulance to the hospital......ummmm.....ok.......wow.......

The VERY good news.....he was talking and could move his arms and legs......oh.....thank you Lord!!

The not so good news.....it looked like his leg was broken......ok.....bummer......but......it would heal in time.....

So now.....three hospitals later......we know that his leg has a really nasty break up into the knee joint.....oh.....not good......and he will need a special orthopaedic trauma surgeon to put it all back together.....ugh......AND they can't do surgery until the swelling goes down............SO..........

They sent him home!!  Ummmmm......seriously......my Dad is not a small guy and my Mom is super tiny......so it has been a big challenge figuring out how to make this all work..........and SO........I've been in Arkansas for over a week now helping out.........and although exhausted at times......I am so thankful that I am able to be here to help out.......

My Dad is a superman.....and even he has struggled with this all.......and just so you know what we are dealing with here.....I talked him into letting me take this picture.....


Underneath that wrap there is a very heavy metal "cast" that essentially immobilizes the leg......

Yeah.....OUCH!! 

So......now you guys know what I've been up to and why you haven't heard from me in over a week.....

AND.....to make matters worse.....I left my computer at home in my haste to get up here......so unfortunately I don't have any of my pictures.....ugh....... I'm so anxious to show you guys so many things.....but it may be hard to do.....so......we'll see what I can come up with......

Ok.....so I have rambled on enough.....and I still haven't said one thing about new wood floors......so I guess I'll save that for next time.....

Until then.......

XOXO-
Kristal

Saturday, October 15, 2011

DIY Half Bath Makeover

Hello friends!!  I hope you all are enjoying a relaxing weekend....

So....today I'm thinking about our half bath makeover.....do any of you have one of these little guys tucked away somewhere in your house?  Well....we do....and like most things "tucked away" it didn't get much attention for a LONG time!!  And let me tell you....whoever originally decorated this baby.....well....I guess I'll be nice and just say.....we do not have the same taste :)

When you get right down to it.....there really isn't much to talk about on the "Before"......but if I didn't share it with you, then you couldn't really appreciate the "After"......right??  So.....

On the upside of the "Before".......there was a very nice pedestal sink in there and cabinets above the toilet that match the rest of the house.....yep......that's about it on the good side........

On the downside of the "Before".......the walls were covered with hideous wallpaper......geez I so wish that I had a close up of this stuff......it was made to look like a bunch of newspapers were pasted together.......yep.......IT WAS BAD!!  Also the fixtures were pretty outdated......lovely silver and gold.....

And.....here is the "Before".....


I know the picture is not that good......but.....well......I didn't have much to work with......and this room is REALLY hard to photograph.....

So.....let's get on to the good stuff......first we had to come up with a plan of attack.....

The hubs did some research and decided that we could paint over the wallpaper......hmmmmm.....have any of you guys tried this technique?  In our case the wallpaper was stuck pretty well to the wall.....so we figured it would be hard to get off.....and we were determined to make this a total DIY job!

Well....at least we thought it was stuck well.....but when we looked really close....you could see a few places where the wallpaper was pealing......so can't paint over that......but we were already set on this plan......so we trudged ahead......

The hubs did some more research and found that we needed to do the following in order to paint over the wallpaper......

1.  Peel off all loose wallpaper
2.  Apply "mud" over the areas where wallpaper was removed
3.  Put "mud" over all wallpaper seems
4.  Sand down all "mudded" areas until you have a smooth surface again
5.  Paint over everything with a oil based primer (can't use water based due to solubility issues with wallpaper glue)
6.  Paint with your color of choice

Sounds like a lot of stuff....huh......well.....we still thought it was faster than trying to peel off a million little pieces of wallpaper!

Ok.....so that takes care of the paint.....btw......we used Vast Desert Behr paint with Primer.....
And we ended up with this.....


Yahoo!!  Things were looking better already!!  Next we decided to address the fixtures.....I am a REALLY lucky woman, because my husband is very resourceful!!  He changed out the faucet on the sink and took down/put back up the light fixture!  BABE -- YOU ROCK!!

So we ended up with this (faucet from Lowe's)....


And I made over the existing light fixture with some ORB spray paint and a couple of new globes from Lowe's.....WOW.....what a difference a little spray paint can make!!


We also decided to turn the fixture upside down......why?.....well......turning the bulbs toward the ceiling really warmed up the light in this space.....

We also replaced the mirror in this space with a big chunky one.....I love picture frames, mirrors, molding, etc.....with big chunky frames!!


AND.....this is a half bath.....so....in my opinion.....it's a place where you can also have a little fun and show some of your personality.....

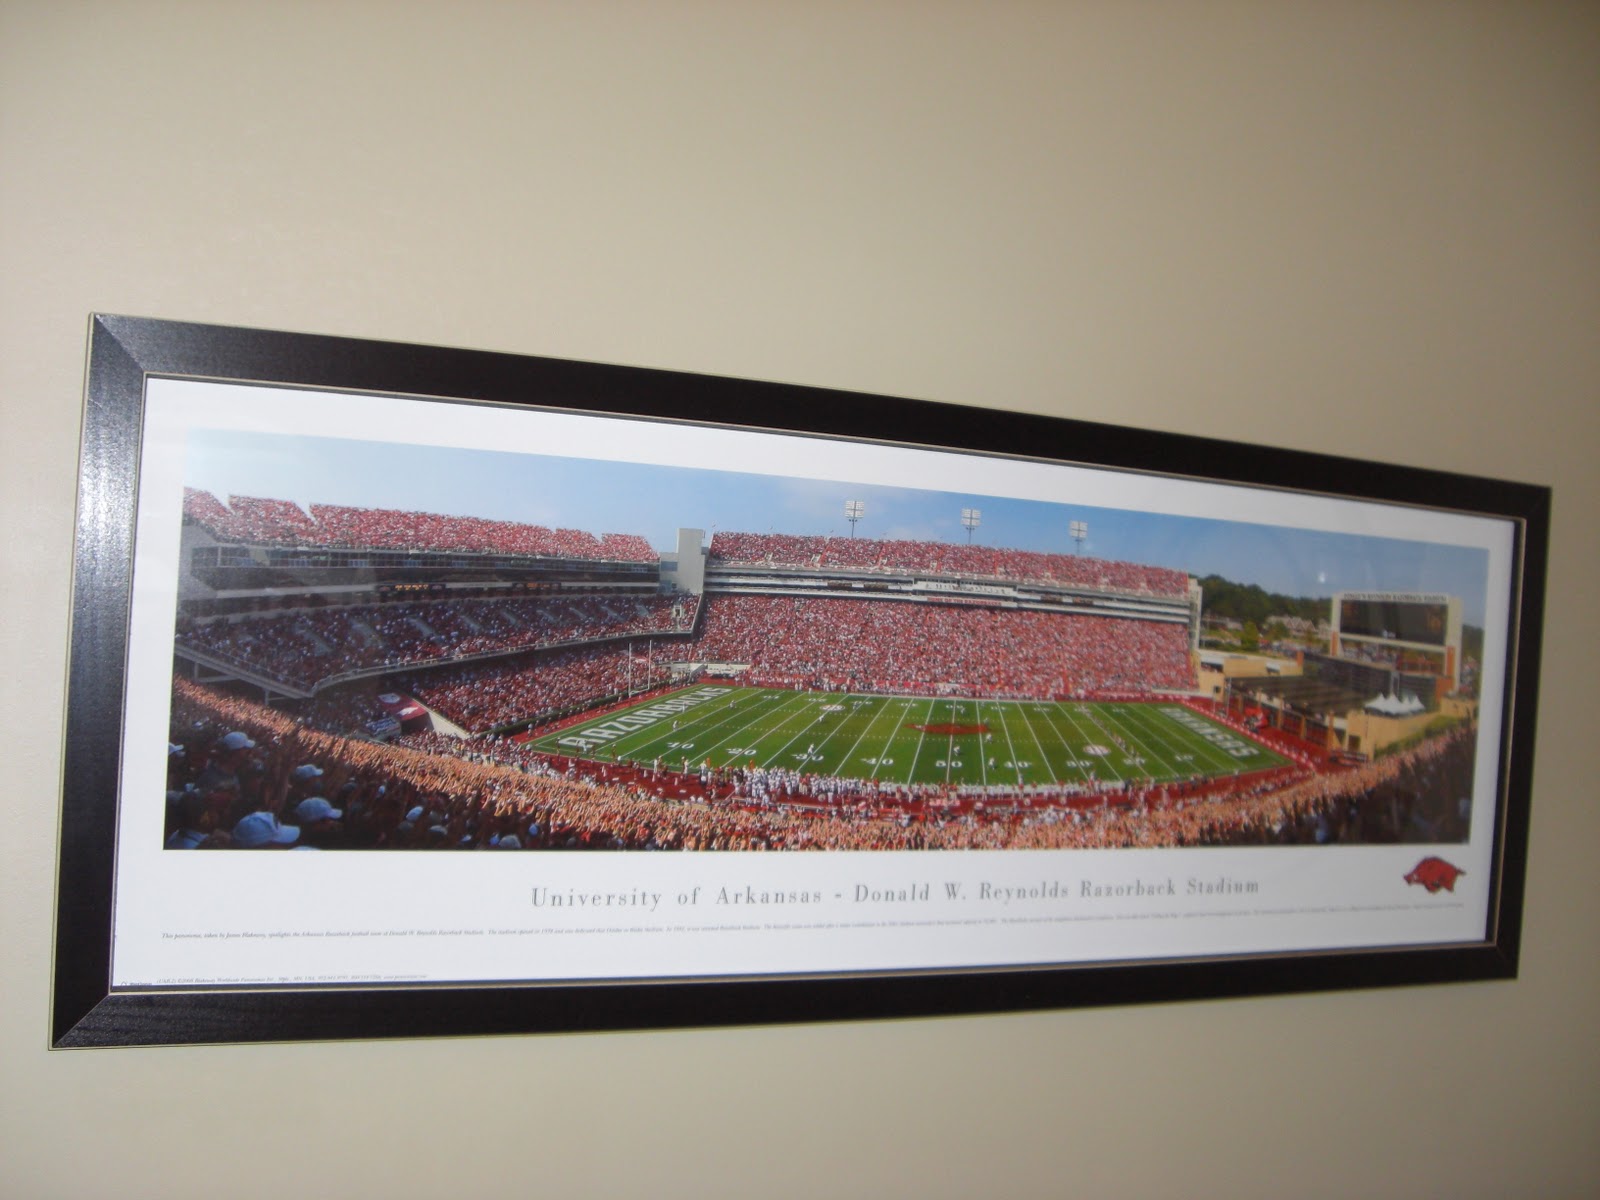
So we decided to add a little Arkansas Razorback love!!  Our friends gave us this awesome picture for Christmas last year and it fit perfectly in this space.....


It is a full picture of the Razorback Football Stadium in Fayetteville.....ahhhhh.....reminds us of home :)

We loved it so much that we decided to add a little more Hog flare on the other side of the room....

And here's an up close look at some of the accents in the room.....


The brown and red hand towels are from World Market, the brown hand towels with red stripes are from Target, the picture frame came from Hobby Lobby, and the "vase" came from Target.

The little shelf that the picture frame is sitting on was a spray paint makeover.....it was a shelf that was collecting dust in a closet b/c I didn't like the color.....so I just use my trusty ORB Rustoleum spray paint to quickly make it over......did I mention I love spray paint.....oh yeah.....I guess I did!!

And here's a look at the last two additions.....


And a rug to warm up the floor a little bit.....


The candle holder and the rug are both from Target.....

So.....we were so happy with how it all turned out.....the best part.....this was a one weekend project!!  AND it just looks SO different......so warm......

I'm sure we may add this or that to this room later, but for now we are calling it DONE!

So what about you guys.....anyone thinking of tackling a bathroom makeover.....are you going small.....like our little makeover......or are you thinking big......like a gut job?  I'd love to hear what you guys are working on!!

Until next time......

XOXO,
Kristal

I'm linking up here.....


Thursday, October 13, 2011

I'M SENDING OUT AN SOS....MY DEN NEEDS HELP!!

Hey guys!!  How has your week been?  I hope it's been good....and if not....just think.....tomorrow is Friday!!!  YAHOO!!

Today I am sending out an SOS!!  Seriously I need help!!  Ok....not like.....real help.....like I'm stuck in a well and I need a rescue or anything......you know.....more like.....oh my gosh I've got five minutes to get ready for this party, which outfit should I wear kind of help :) 

But today we aren't talking about outfits.....today I'm talking about the furniture configuration in my den....

I guess I should start by saying that our den has some challenges.....I guess it's the tough part of this open concept living.....which I love by the way.....but can make it difficult when trying to arrange furniture.....

So I'll start with a little schematic to try and orient you with my problem.....


SO....I'm not sure if the schematic will help or not.....but I thought I would give it a try.....

I think the big problem is the lack of actual wall space.....in reality we only have one true wall.....because on one side we have entrances from the breakfast area and from the entryway....on another side we have floor to ceiling windows.....and on the third wall we have half a wall of windows....

Ok....so I'm not complaining....I LOVE the light in this room!!  BUT....I'm just trying to figure out what to do with the furniture.....

Our couch is BIG......and it has one of those oversized chairs to match.....other than that we have a big screen TV and a hideous recliner (we hope to replace soon.....but that's been the plan for years now....and it still hasn't happened yet).

Ok....so that's what we've got to work with.....and here are some pictures of the way this room has been set up for the past 10 years.....

I'll start with a look at the room from the breakfast area....


And now....some pics as I spin around the room.....turning to my right.....


In this one you can see the entrance from the entryway....sort of behind the couch (although it really isn't behind the couch or course)....


This is looking back into the breakfast area / kitchen....


And here we have almost come full circle.....


Just one more to show you the windows on this wall.....and now we are back where we started....looking from the breakfast area....


SO.....what ideas do you guys have??  Please.....go ahead.....think it through.....I don't want to taint your mind with what I'm about to show you.....  ;)

I decided the other day....just to change it.....live with it for a week.....and see if I liked it better.....so this is what I came up with.....

Again.....I'll start with a look at the room from the breakfast area....


And again....pics of the room as I spin to my right....


Please ignore the off center artwork in this one....I know it will have to move if we stick with this configuration.....

This is probably what I like least about this configuration.....the furniture on this wall just looks so pathetic :(


And this is what I like best about this configuration.....I love that the couch has now become the focal point.....it is the first thing that you see when you walk in from the entryway......of course it is in front of the windows, but I floated it and put a small sofa table behind it.....where we like to sit our drinks :)  If we were to leave it like this....then I'd like to get some "chunky" lamps to go on either side.....


SO......what I like about the new configuration.....
1.  I like the couch being the first thing you see when you enter the room.....
2.  I like having a sofa table behind the couch.....great for sitting stuff....
3.  I like that I can hide all of Kali's toys behind the couch :)  Shhhhh.....don't tell.....ok.....
4.  I can still see the TV from the kitchen

What I'm not so crazy about.....
1.  The TV covers part of the window on the far wall, so it looks like a design flaw....in my opinion....
2.  The furniture across from the couch just looks sad.....not sure if this is do to the configuration or just because we need to get rid of this furniture and try something new????  If so.....what????
3.  I'm not crazy about looking dead on to the end of the couch from the breakfast area.....something just doesn't feel right there.....

SO......we've lived with the new configuration for over two weeks......and I've decided I do like it better, but I'm not convinced that it is the best set up yet.......so I'm thinking about changing it again.....

What do you guys think?  Seriously.....I need your input.....please don't be shy!!  I am really stuck here!!

Until next time.....

XOXO,
Kristal

P.S.  If you look close you'll see a sneak peak of somethings I'll share more details on later.....our "fake" Board and Batten and some new wood floors :)

Monday, October 10, 2011

New Floors!! Yeah!!

Hello friends!!  How was your weekend?  I hope it was great!!  Ours was fun filled and quite busy....just the way we like it!!  :)

I really intended to post something yesterday.....but what do ya know....I couldn't find my computer power cord.....and the computer (of course) was DEAD!  Ugh!!  So.....fast forward to today.....and I still couldn't find the dumb cord!  I was seriously thinking I would have to just buy a new one, but decided to give in and admit to the hubs that I couldn't find it (double ugh!!).......AND luckily he was able to find it....BUT in my defense.....it had ended up in his "cord drawer"......which is essentially a black hole of sorts.....I NEVER go near it.....SO he had to be the one who put it in there......so Ha!  Maybe I'm not as scatterbrained as I was starting to think.....

So.....anyway......I've been meaning to post on this for a while......since you've already seen a little sneak peak it isn't really a surprise I guess....but good stuff none the less.....

We've got new floors in the entryway!!  You might remember seeing the new floor at the bottom of our "new" stairs.....


Ohhh....it makes us feel so FANCY!!  Ha, ha!!  Seriously it does!!

As usual we agonized over what to do in this space.....previously we had wood in the entryway and all through the front of the house on the first floor......and I LOVE wood floors, so it was a hard decision to replace it!  BUT....the wood in the entryway was in pretty bad shape.....it was really faded from all the light that comes through that big window over the door......and there was some water damage from all of us tracking in our wet feet......and my "little" bulldog had really done a number on it with his toenails (he loves to stand at those windows next to the door and bark at all the neighbors).....

BUT....come on....who couldn't forgive this precious little face.....


BUT.....the biggest reason for change.....we wanted to put a dark wood floor in the back of our house in the den.......so I don't know if this is a rule or not (and we don't necessarily follow decorating rules at our house anyway), but I have always heard that you shouldn't have different woods touch each other.......SO in order to break up the lighter wood in the front of the house from the (soon to be) dark wood in our den.....we needed something different in the entryway.....

So......what to get.....what to get......

We ultimately decided to go with a stone entryway with granite accents......so this would sort of mirror what we have in our backsplash in the kitchen....using a similar type of stone and the same granite.....

So.....here.....we.....go.......we decided that this was not a project we could do ourselves.....and oh my goodness....in hindsight what a good decision that was.....

That wood floor was SERIOUSLY stuck.....


At first the guy worked with a hammer and a chisel....YEAH.....that wasn't working!!  So next.....I kid you not.....they brought in a jackhammer type thing.....


And....finally.....after a LOT of work....those wood floors were gone! 

Next.....the guy got busy installing the stone & granite....


Wow!!  The guy did an AWESOME job!!  He is the same guy who installed our kitchen backsplash....so we knew that it was going to be GORGEOUS!!

Again....we used "our guy" from Reema Flooring in Pearland, TX who does all types of countertops and flooring....He is great to work with and we were really happy with everything! He does jobs all over Houston and the Houston suburbs....If you want to see the work they did in our kitchen, then check it out here.....

If any of you decide to use him.....just be sure to tell him that you heard about him from me :)  And.....no.....I'm not getting anything for this little endorsement!!

So....finally.....the floors were finished.....

Here you can see the lighter wood still in the front two rooms....the new entryway floor.....and the refinished staircase.....


And....how about just one more.....with the refinished stairs in the foreground....


Ahhh....LOVE.....IT!!  After all the agony over what to do in this space.....we were SO HAPPY with how it all turned out!!  You just never know....ya know......until you see it....in your house......

Anyone else put down stone in their house or made over an entryway?  Did you do the work yourself or hire it out?  I would love to hear about it!!

Until next time.....

XOXO,
Kristal


Thursday, October 6, 2011

A Marketers Dream & Some More Love for Fall

SO......I went into Wal-Mart today on a quick errand....all I needed was a bottle of Soy Sauce......AND..... $53 dollars later I was on my way home.....Ugh!!  Are you kidding me??  And as I was replaying in my mind how I went from my $2 bottle of Soy Sauce to my $53 bill.....I thought.....I am a marketing persons dream!!  Seriously......I am a sucker the target audience.....the demographic of choice......GEEZ.....they have my number!! 

Well.....ok.....so now you've heard the bad news about my big bill, but before you judge too much.....just wait until you see some of what I got!!

Remember when I told you here that I was Willing Fall to come.....well.....it's not quite here yet......so I thought maybe I needed a little more Fall decor to really cinch the deal.....

So.....when I saw these beauties.....I just had to have them.....


I know.....I know.....I am officially OLD for getting excited over Mums......but I don't care.....I like them!  These guys were so big and had so many blooms.....just gorgeous......I looked at the tag and they are "Wal-Mart" brand, so if you're interested you could probably find them at your own local Wally World.  In my opinion they were a little expensive....$12 each......but my Mom said  that was a good price.....so I am going with that.....yeah....yeah.....what I meant to say was......they were a steal at only $12 each.....LOL! 

BUT.....you know I couldn't just stop there.....I rounded the corner.....and what do you know.....there they were.....some BIG.....BEAUTIFUL.....PUMPKINS!!!  Nothing quite says Fall, like a pumpkin!! 

Every year we like to have a pumpkin carving party....it's become sort of a ritual at our house.....and last year I waited way to late and the only pumpkins left.....well.....what can I say.....they weren't pretty......those were the most ugly.....messed up pumpkins I had ever seen.......SO.......when I saw these most lovely pumpkins today.....of course......I had to have them.....

So.....I added some pumpkins to the mix.....


AND.....I totally love how these little additions added to our entryway (please ignore the old mat, door that needs to be stained, etc, etc).....


And.....a look at the bigger picture....


The Sago palms next to all that Fall decor sort of cracks me up.....just doesn't seem right.....like seeing a palm tree with snow on it or something......

Anyway.....after all that goodness.....I think I've almost forgot about my little overspend at Wal-Mart.....well....almost.....

Have you ever gone into the store for something little and emerged later with a big bill and a load full of stuff?  Oh....come on.......surely I'm not alone in this.......

Anybody doing any last minute Fall decorating?  I'd love to hear about it......

Until next time.....

XOXO,
Kristal

Wednesday, October 5, 2011

More Spray Paint Love....a Ceiling Fan Makeover

Hello all!!  Well it's been an eventful start to the week....I won't get into all the details, but Thanks Be to God that everything has worked out ok!!

So....I've already professed my love of spray paint to you all....so since my secret is out....I thought it was time to show you another spray paint project....

So....as usual.....I didn't take enough pictures.....ugh!!  I promise....I am doing better on this.....there will be posts with sufficient pics in the future.....promise!!  But for now.....we'll just have to make do.....don't worry I've got the Before and After pics and that's really all that matters anyway!!

So here's the deal with our house.....the people who built it really spent some $ in some areas.....and really didn't spend $ in other areas.....it is BIG TIME obvious!!  One area that they did not spend $ on was fixtures.....they were SO bad!!  We've changed out a lot of them and made over some others....so today I'm sharing one of these lovely hideous fixtures and how I made it over with just a little spray paint.....

So.....this is what I started with.......

I know......I know......isn't it SO beautiful awful.......go ahead......bask in the glow of it's loveliness hideousness......Ha!  Sometimes you just gotta laugh....ya know......

It is one of those contractor grade ceiling fans....white.....with gold.....oh yeah....so not my favorite!  This baby was living in our guest room.....and since we don't go in there all that often.....it had survived in there WAY TO LONG!  Our guest room has a black headboard and black furniture.....so I decided to make the ceiling fan match.

So first I got the hubs to take it down for me and then help me take it apart.  It was kinda dirty....yuck....so I gave everything a good wipe down.  And then out to the garage for a little makeover.....

Remember all those SECRETS that I told you about a successful spray paint job.....well....if you've forgotten, then go here to refresh your memory.

In addition to spray painting the blades and the body of the fan (make sure you have separated out the motor part -- you don't want to get any paint in there!!).....I decided that I wanted to also do something with the glass globes (where the light bulbs are).....so I got some frosting spray (which can be found in the spray paint section at Lowe's or Home Depot) to frost those baby's......the frosting spray is so cool....and very easy to work with.....

This was a quick and easy project.....just the way I like 'em!

And.....here's what I ended up with......


And here's a look with the light on.....


And just one more.....Before and After side by side....


Ok....so not too shabby....seriously.....it looks SO MUCH BETTER!!  And it finally matches everything else in the room....Yay!!  The best thing....it cost next to nothing to make this much needed change....Yahoo!! 

So.....have any of you caught the spray paint bug yet?  Anyone thinking about tackling a project like this?  PLEASE....DO TELL......I would love to hear about it :)

Until next time....

XOXO,
Kristal

I'm linking up here.....

Monday, October 3, 2011

Kitchen Remodel.....A Dream Come True!

Wow....it's been another busy week.....I'm sure you all can relate!  Normally we get to catch up a little on the weekends, but this weekend we went to Dallas to watch the AR vs A&M game......it was FUN......and I would be remiss if I didn't say this....

WOOOO PIG SOOOOOIE!!  GO HOGS!!
Sorry.....couldn't help it......but seriously it was a good game and if we wouldn't have had a bit of luck it could have turned our very differently!

Ok, so that's out of the way.....now onto some more good stuff.....I've been wanting to write on this all week.....and just now I am finally getting it all together.....

So....anyone interested in a mini kitchen remodel?  Well.....we were.....for years I was dreaming of granite countertops.....a new sink.....painted walls......etc.....SO FINALLY we pulled the trigger and went for it!!  YAHOO!!!

Ok....so the sad part first.....I hardly have any Before pictures.....I mean what was I thinking???  I don't know......so we'll just have to make do with the few sad Before pics that I have.....

So here we go (please ignore all the "stuff" on the counters - we were getting ready for a party)....

And here is the only close up pic that I could find (this was actually an old film picture that I had to scan in.....wow.....technology has come a long way).....


And you might wonder what is going on in this picture.....yep....that's the hubs cutting the top of our wedding cake for our one year anniversary.....and if you are wondering.....it tasted TERRIBLE!!  AND.....this also tells you how old this picture is.....yep.....almost 9 years to the date......BUT I promise....not one thing was done to this kitchen in all those years......LOL......no......seriously......it stayed exactly the same......

We started with white cabinets, some sort of neutral linoleum (maybe), and neutral backsplash with a few green diamonds mixed in.....ahh....yeah......I know your jealous.....ha.....well....probably not......oh yeah.....and the kitchen was painted green to match the diamonds in the backsplash of course!!

SO.....what did we decide to do......well.....like I said.....I had granite on the brain.....so we knew we were going to do that......but what kind???  Hmmmm......I had no idea.....and then the backsplash.....oh my gosh.....I really had NO IDEA!!  You see this was before I knew about Pinterest (if you need an invite, then let me know) and all the awesome blogs out there......

SO.....I just looked at the kitchens of people I knew to get ideas.....and we ended up really liking the granite that my brother had in his house......Tan Brown......which is not really tan or brown.....but anyway....that's what it is called......it looks like this up close.....


It's really more black with some brown/red/white mixed in.....at least that's what I thought......in any case we thought it would be a nice contrast with our white cabinets.....

Now.....the backsplash was a more difficult pick.....we AGONIZED over this choice......I mean this is a good bit of $ that we are about to spend on this stuff.....so we wanted to be sure we loved it!

SO.....we talked with "our guy" who does granite, tile, wood floors, etc, etc....and he gave us a disk of his previous jobs to look at......which was a really big help! 

We decided to go with a stone backsplash with granite accents....and we also had them do a medallion over the built in stove top (wasn't too sure about that, but really loved it once it was installed).....

Oh yeah.....and the thing I love best about this makeover.....we had them extend the island just a bit, so that we could have two barstools and eat at our island.....LOVE, LOVE, LOVE this......we like to eat here a LOT and it seems to be a place of conversation whenever guests are in town.......love it! :)

Ok.....so enough....jibber jabber......here are the After pics......


And a few up close pics.....


The medallion over the stove top.....


The new stainless steel sink.....I highly recommend one of these.....so pretty......  :)


Super up close, so you can get a look at the stone tile with the granite accents....


And one more shot of the whole room.....note....we still haven't painted in this pic.....so we still have a lovely green over the sink and above the cabinets.....


And here are a few pics that I took today, so that you could see the finished kitchen with the new Studio Taupe paint by Behr of course....LOVE their paint!! 
(Hopefully I stood back far enough, so you can't see my dirty dishes in the sink :) )


Yay!!  So happy with how all of it turned out!!  I just LOVE this room now......now if I just knew how to cook we would be in business.....ha, ha!!

A few more quick notes.....the barstools are from Target.....they just fit right in with our color scheme....the wood is black and the back and seat are a tan linen looking material.....and the stove top is a GE Profile.....the sink....no idea.....it came with the granite :)

AND.....if any of you live close to Houston.....and need "a guy" who does all types of countertops and flooring....we used Reema Flooring located in Pearland, TX.....the guy who owns the place is great to work with and we were really happy with everything!  He does jobs all over Houston and the Houston suburbs....he even told my brother that he would go as far as Beaumont......

Ok....so again enough with the jibber jabber.....what do you guys think?  Do you like it?  Would you have done something different?  Have you recently done a kitchen remodel??  I'd love to hear about it and see some pics!!  :)

Well....I've got to run....my baby just squirted juice all over the floor....and she's wanting me to play.....so....

Until next time.....

XOXO,
Kristal
Related Posts Plugin for WordPress, Blogger...